
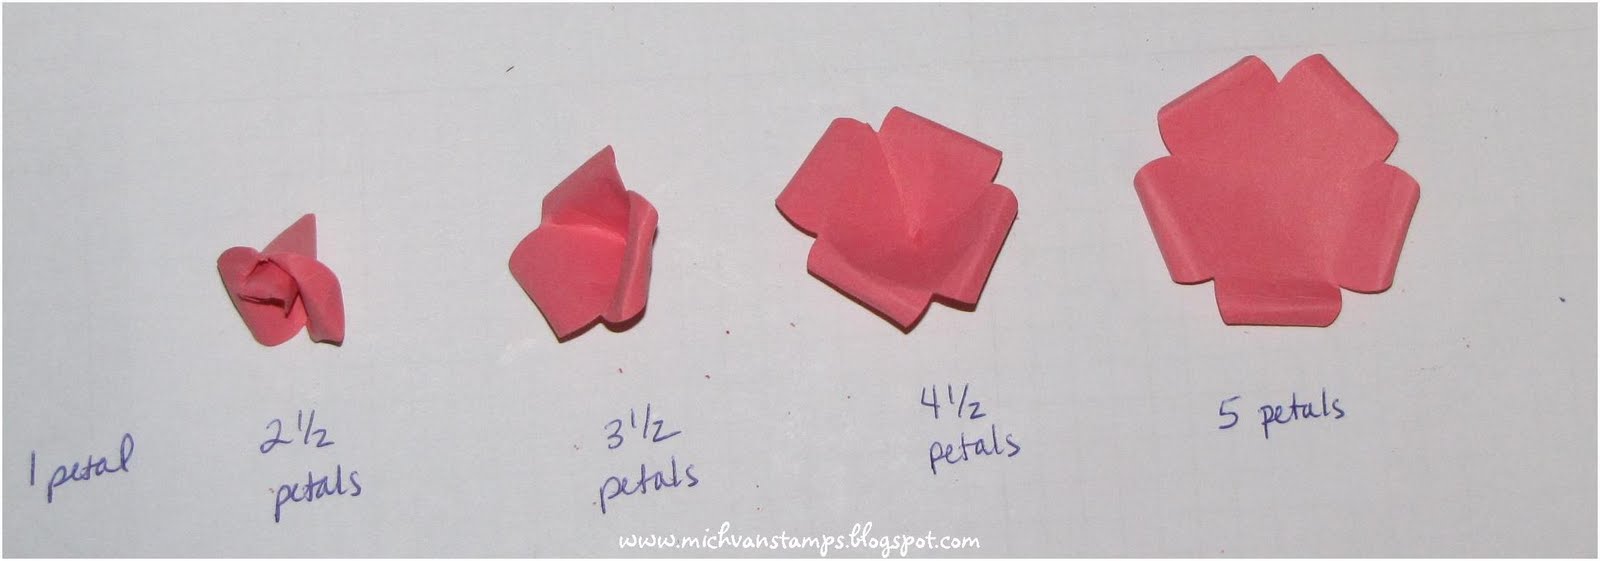
Start by punching four flowers from card stock or designer series paper -- for these, I used the Five Petal Punch:


Next, put a glue dot onto the 1/2 petal "tab" on the 4-1/2 petal flower, and bring the tab behind the petal across the gap from it, hiding the tab on what would be the outside of the flower.

Repeat these steps with the 3-1/2 and 2 1/2 petal flowers, and roll up your single petal, so you end up with this:

Now, it is time to assemble the flower! (You could also sponge some color around the edges of the pieces at this stage, to add some extra 3D oomph).
The last time I showed this assembly step, I was asked if it was better to assemble from top to bottom or bottom to top -- I had been doing bottom to top, but that got me thinking, why not try the other way. Well, turns out top to bottom does work better for me (thanks to Sparrow for making me test this!) So, put a glue dot on either side of the bottom of the single petal roll, and carefully insert that into the center of the 2-1/2 petal piece so you end up with this:

This would make a cute little but. But, for a larger flower, again, use two glue dots on either side of the outside of this new piece, and insert into the 3-1/2 petal piece. The end result should look something like this:

Again, you could stop here, or if you want a larger rose, use two glue dots on the outside to adhere this piece to the 4-1/2 petal piece, like so:

And, finally, adhere this piece to the 5 petal piece, either one or two glue dots will work fine at this stage. Here's the finished product:


Second, how each piece looks after its petals are connected by a glue dot, and petals curled. Well, and actually in this photo, the assembly process is already underway:
Here are the two glue dots on the outside of the 3-1/2 petal piece as it is about to go to the 4-1/2 petal piece:

And, the finished product:

And, a side view:

Finally, for sake of comparison, here are four roses I've created. The top two were made using the Extra Large Flower Punch, and with the leaves just slightly curled.

The bottom left rose is the one created in the photos above using the Extra Large Flower Punch, and the bottom right is the one created in the photos above using the Five Petal Flower Punch.
Hope you enjoyed the tutorial! Look forward to seeing what you create with it!
- Michelle
3 comments:
OMG!!! Those roses are so darn beautiful...so cool!!! And, unlike other ones I have seen...so very easy to duplicate! Thank you so much for the inspiration! I'm lovin' it!
Marlene Caravello
happy 100th!! awesome tut...now I really gotta try it!
Woot woot!! 100th... awesome, Michelle! Keep going strong! FABULOUS tutorial!
Post a Comment